AI high-resolution images are now the backbone of cinematic video creation & high quality creative workflow in 2026. Still, very few actually know the best way to write image prompts to get controlled output.
As a Copywriter & Content Marketer, I generally use lifelike AI images for blog and YouTube video thumbnails and stuff like that.
But it wasn’t always this smooth. There was a time when I struggled to get usable outputs, no matter how many image prompts I tried.
The turning point came when I stopped treating prompting as guesswork and started approaching it as a structured skill.
In my experience, once you understand how to write detailed and structured prompts, you can produce high-quality results again and again without frustration.
However, this guide isn’t just based on my personal experience. But I took insights from video editors and creators who consistently generate high-quality AI images & videos using a repeatable framework.
In this blog, I’ll break down that exact process so you can take full control of your AI image creation workflow and dramatically improve your results.
So, let’s start.
Table of Contents
What Are the Main Components of a Good Image Prompt
Before I give you the ultimate prompt solution regarding image prompt writing, I just want to share something important.
I mean, this is the fundamental part of AI image generation, and it’s exactly why a lot of creators get results that feel random.
If you use any AI image generator for your image production, you probably already know that AI image generators follow a structured pattern.
It means if your prompt doesn’t follow a clear pattern, you’re not really directing the AI—you’re just hoping it guesses what you want.
Hopefully, this is true, and guessing is not a strategy.
And this is why you need to follow a structural approach.
Once you understand the core building blocks, you’ll stop feeling stuck and start getting predictable, high-quality outputs.
So, let me break down exactly what goes into a prompt that works.
Basically, every strong image prompt is built from 5 components working together.
- Subject – What is the main focus of the image?
- Camera Angle – From what perspective is the subject viewed?
- Style and Medium – What visual style defines the image?
- Lighting – How is the scene lit?
- Colour Palette – What tones and colours dominate the image?
Trust me, if you master these 5 components, then you’ll never feel lost when generating any AI image through prompting.
In the next section, I’ll show you how you can easily write a good image prompt by just using the above 5 components.
How to Write Good Image Prompts: Easy Steps to Follow
As I mentioned earlier, you just need to be very precise over these 5 parts.
In simple terms, the more intentional you are, the better your results will be.
Let me break it down step by step.
1. Subject
The subject is the first thing a viewer’s eye should fall on, and it’s the first thing you should define in any prompt.
But here’s where most people go wrong: they mention the subject, but they don’t describe it.
So, you should not just mention the subject, but you also need to describe it in a well-structured way.
I mean, suppose you want to generate a realistic image of a girl. Here are two ways you can use to generate your subject ‘Girl’.
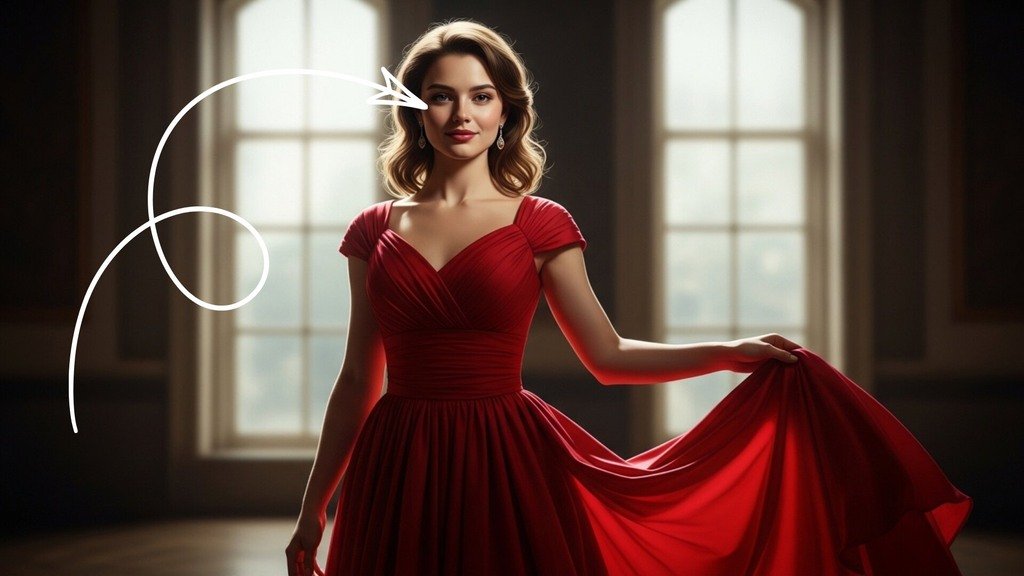
One is just to prompt “generate a realistic image of a girl in a red gown”, which is a sign of a weak image prompt.
Or you can prompt “Generate a realistic image of a girl in his 20s, standing, with a soft smile on her face, a calm expression, wearing a red gown and an attractive look”, which is a strong one.
Can you see the difference? The second version gives the AI clarity—age, posture, emotion, and visual details. That’s what creates control.
It means you are giving enough context to understand the image generation model to generate accurate AI images for you.
So, describe your subject the way you would describe it to a sketch artist. Include who they are, what they look like, what they’re doing, and how they’re positioned. Leave nothing open to interpretation that matters to the final image.
So, the key is simple: don’t just name the subject but define it.
Think in terms of:
- Age or type
- Expression or emotion
- Pose or body language
- Clothing or defining features
Once your subject is clearly described, the rest of the image prompt becomes much easier to build.
2. Camera Angle
This is the second most important thing that you should look after because this part will help you to shape your image in a new, attractive look.
But before you use camera angles to your image, you need a clear understanding of the types of camera angles filmmakers use.
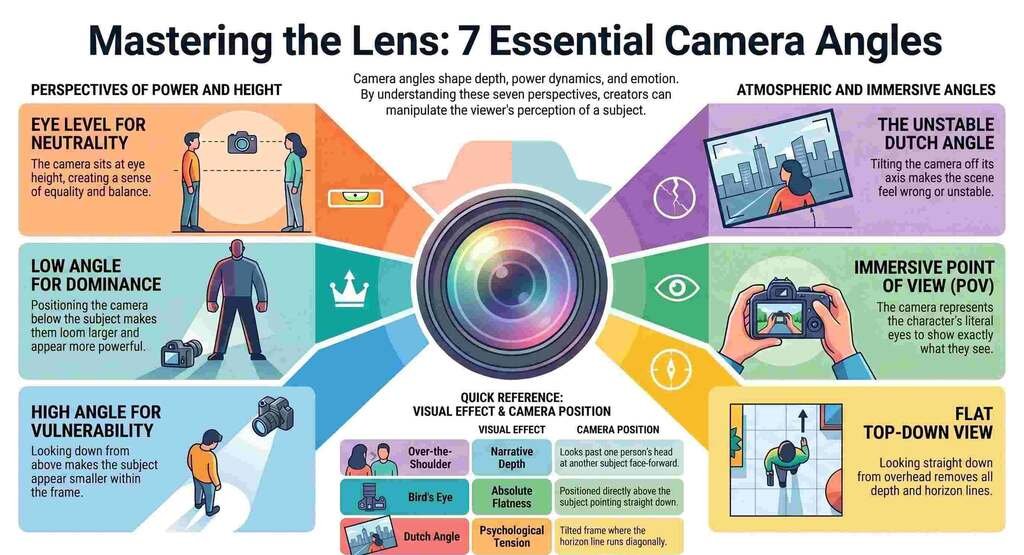
1. Eye Level:- The camera sits exactly at the height of the subject’s eyes. The horizon line runs straight through the middle of the frame. Nothing is above or below; everything is equal.
2. Low Angle:- The camera is positioned below the subject and looks upward. The subject looms larger in the frame. The sky or ceiling often becomes the background. The subject appears to rise above the viewer.
3. High Angle:- The camera is positioned above the subject and looks downward. The subject appears smaller within the frame. The ground or surface below becomes prominent. The viewer is literally looking down on the scene.
4. Dutch Angle:- The camera is tilted off its horizontal axis, the frame is literally rotated so the horizon line runs diagonally rather than straight. Everything in the image feels slightly wrong, slightly unstable.
5.Top-Down / Bird’s Eye View:- The camera is positioned directly above the subject, pointing straight down. The image is completely flat, no depth, no horizon line, everything arranged on a single plane as if seen from directly overhead.
6. Over-the-Shoulder (OTS):- The camera looks past the back of one person’s head and shoulder at another person facing toward the lens. You see both subjects — one from behind, one face-forward.
7. Point of View (POV):- The camera represents the literal eyes of a character. You see exactly what they would see — their hands, a door they’re opening, a person they’re talking to — from their precise vantage point.
Some Common Shot Types to Use in Your Image Prompts
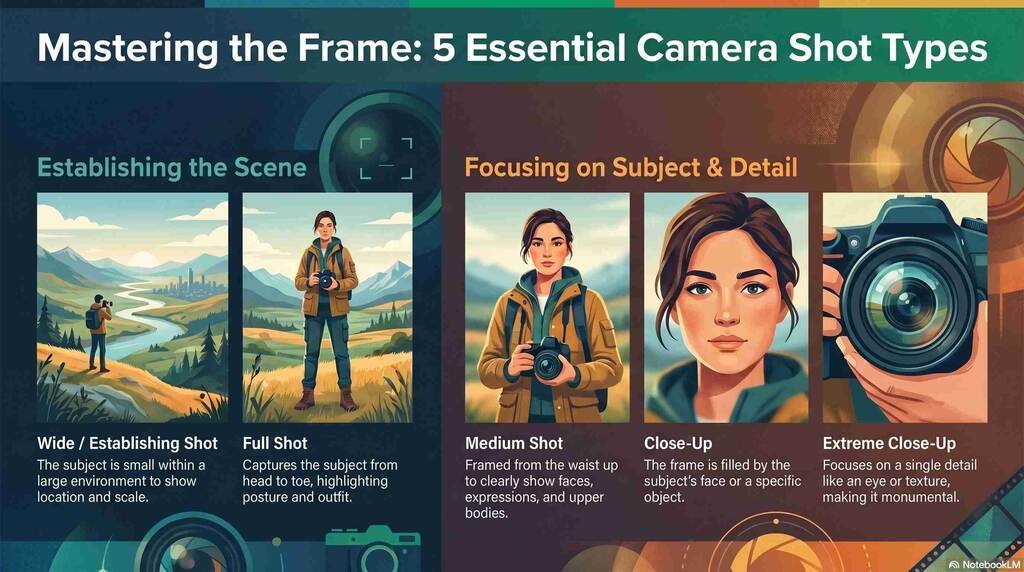
1. Wide / Establishing Shot:- The subject is small within a large environment. The world around them dominates the frame. You see everything — the location, the scale, the context.
2. Full Shot:- The subject is captured from head to toe within the frame. You see the complete body like posture, outfit, shoes, everything, with a small amount of space above and below.
3. Medium Shot:- The subject is framed from roughly the waist up. You see the face, expression, arms, and upper body clearly, but not the full figure.
4. Close-Up:- The frame is filled almost entirely by the subject’s face, or by a specific object. Background detail is minimal or blurred. Every detail of the subject is visible and prominent.
5. Extreme Close-Up:- A single detail fills the entire frame — an eye, a fingertip, the texture of a material, the label on a product. Context is almost entirely removed. The detail becomes abstract and monumental.
So, now the question is how to use these camera angles and shots in a practical way.
It’s pretty simple. You just need to follow a consistent order so the AI understands your intent clearly.
Start with the subject → then define the camera angle → then specify the shot type.
This sequence works because it mirrors how visuals are naturally constructed, like what we see first, and then how we see it.
Now compare how this improves clarity:
- Basic version: “Generate a realistic image of a woman in her 20s wearing a red gown.”
- Improved version: “Generate a realistic image of a woman in her 20s, standing with a soft smile and calm expression, wearing an elegant red gown, camera angle: bird’s-eye view, shot type: full shot.”
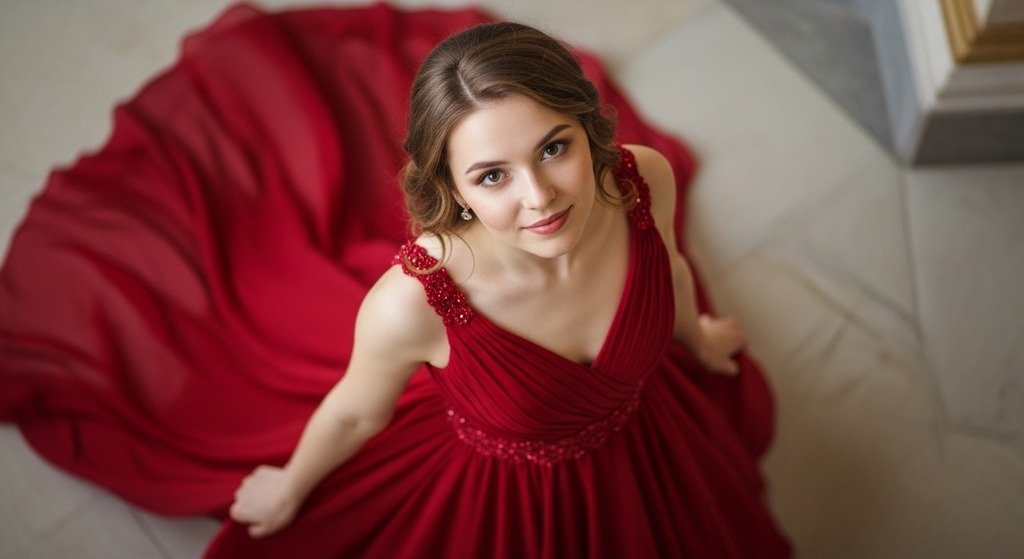
Notice how the second prompt gives a clear visual direction. The AI now understands not just who the subject is, but also how the scene should be framed.
Here is a quick tip I want to disclose.
- Camera angle controls perspective (e.g., eye-level, low angle, bird’s-eye view).
- Shot type controls framing (e.g., close-up, medium shot, full shot).
When you combine both correctly, your images instantly feel more cinematic and intentional rather than random.
3. Style and Medium
Style and medium are also important sections of better AI image prompting.
Think of it this way:
- Style defines the visual language
- Medium defines the format or technique
Style (How it looks)
Basically, style covers the visual language, such as
- Photorealistic
- Editorial.
- Illustrative
- Painterly
- Cinematic
- Minimalist
- Retro
- Surreal.
Medium (How it’s created)
Medium covers the format:
- Photography
- Oil painting
- Watercolour
- Digital illustration
- 3D render
- Charcoal sketch. etc.
I often combine both in a single line. The more specific your style reference, the more distinctive your output. Generic style descriptors produce generic images. Specific ones produce images that actually look like something.
Example:- “Generate a Photorealistic photography style image of a girl in his 20s, standing, with a soft smile on her face, a calm expression, wearing a red gown and an attractive look, camera angle (Low Angle), Shot Type (Extreme Close-Up)”.
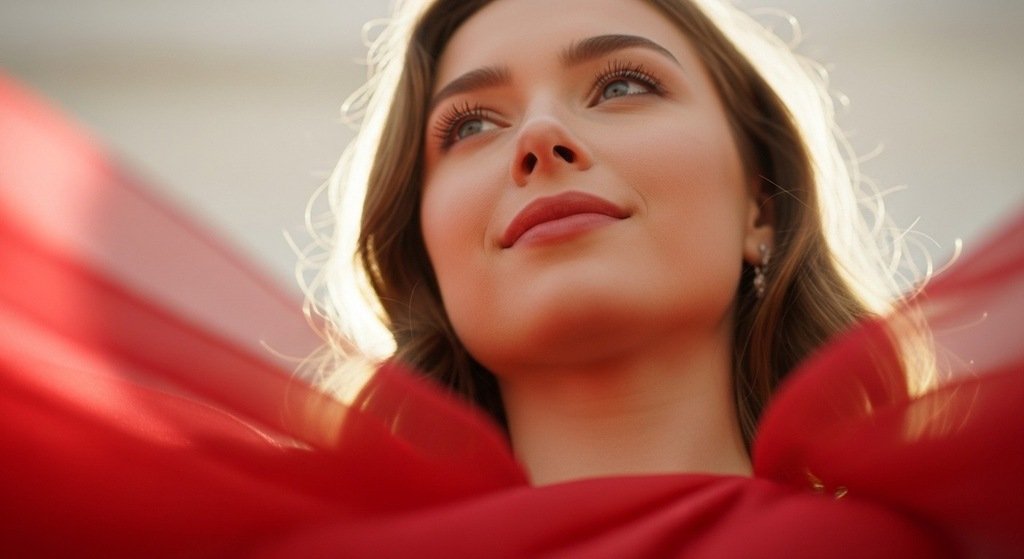
Notice how “photorealistic” and “photography” work together. This alignment makes the output feel grounded and believable.
4. Lighting
If I had to pick one component that transforms an average prompt into an exceptional one, it’s lighting.
You know, lighting is mood, lighting is emotion, and most importantly, lighting is the difference between an image that feels alive and one that feels like a stock photo.
Here are the lighting descriptors that you can use to strengthen your AI prompt.
- Soft natural light — Diffused, flattering, editorial. Great for lifestyle and portrait content.
- Golden hour light — Warm, cinematic, nostalgic. Feels emotional and beautiful.
- Hard side lighting — Dramatic, high-contrast, sculptural. Strong mood.
- Soft lighting — Clean, controlled, commercial. Perfect for product photography.
- Rembrandt lighting — Classic portrait lighting with a small triangle of light on the shadow side of the face. Painterly and sophisticated.
- Backlight/rim lighting — Light comes from behind the subject, creating a halo effect. Cinematic and ethereal.
- Flat lighting — Even, shadowless. Works for graphic and illustration styles.
- Neon / artificial light — Urban, moody, contemporary. Great for nighttime scenes.
But here is an important thing to note.
You should always specify the direction of the light, not just the quality, like “Soft light from the upper left, casting a gentle shadow to the right” is a lighting brief.
Example:- “Generate a Cinematic Digital illustration style image of a girl in his 20s, standing, with a soft smile on her face, a calm expression, wearing a red gown and an attractive look, camera angle (Eye Level), Shot Type (Wide / Establishing Shot), Rembrandt lighting from the left side.”
5. Colour Palette
AI image models default to bold, saturated, high-contrast colour because statistically, that’s what gets positive feedback in training data. It looks impressive at a glance and completely unusable in most professional contexts.
But this is up to you whether you want to use colour palettes to make your AI image more visually attractive.
Basically, the colour palette is the component that brings your brand alignment, emotional tone, and visual consistency to your outputs. And it’s one of the fastest ways to make an AI-generated image look intentional rather than accidental.
Here’s how you specify colour in your prompts:
- By brand: “Navy, white, and gold — clean and premium”
- By mood: “Moody, dark academia — deep greens, burgundy, aged paper tones”

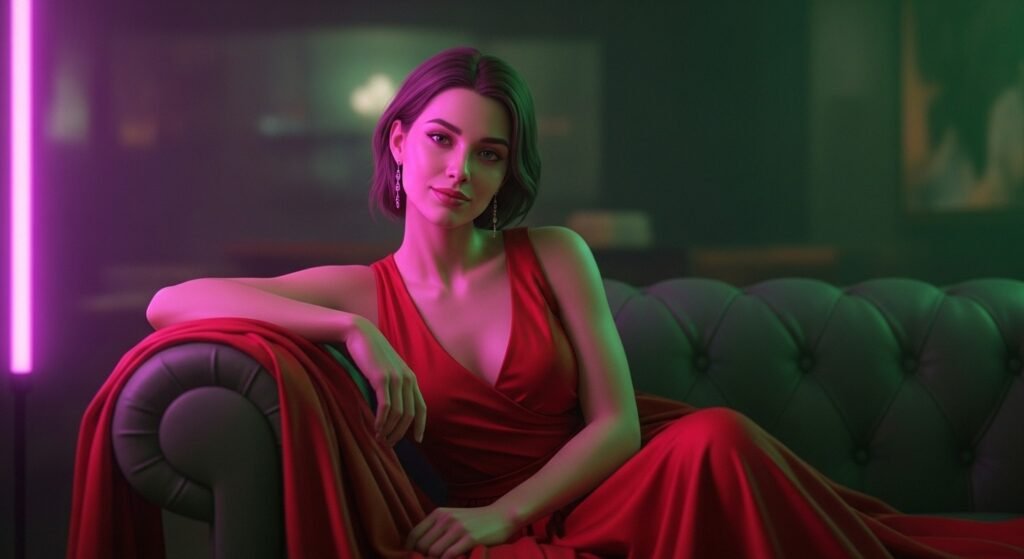
Example:- “Generate a Cinematic Digital illustration style image of a girl in his 20s, sitting on a sofa, with a soft smile on her face, a calm expression, wearing a red gown and an attractive look, Eye Level camera angle, Shot Type (Wide / Establishing Shot), Neon lighting from the left side, a Moody, dark colour palette.”
So, now I want to generate a final image with a precise image prompt to show you how you can follow the exact same image prompt writing formula to generate high-quality AI-realistic images for your projects.
What Does a Good Image Prompt Example Look Like
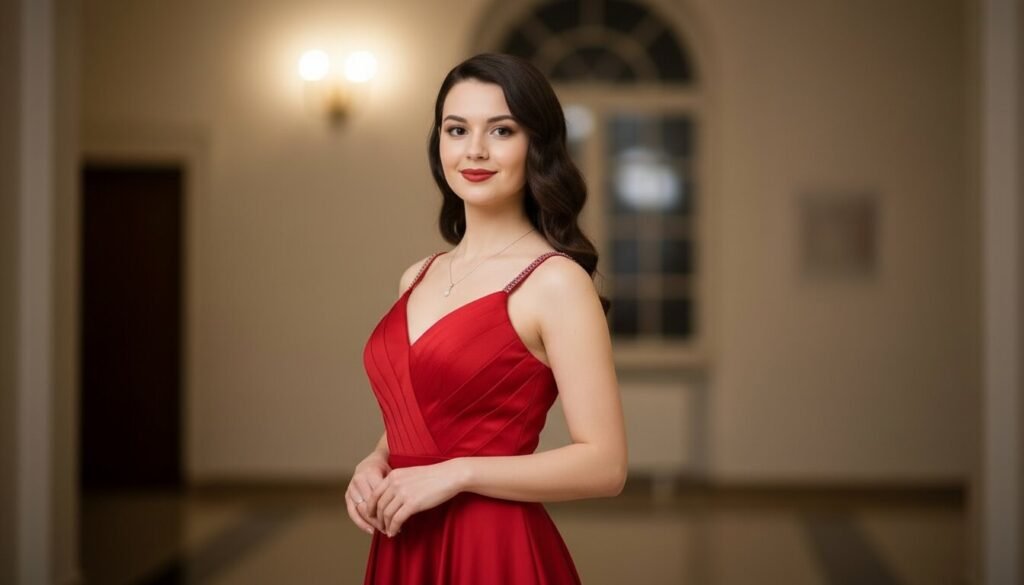
I want to generate a hero character for an XYZ luxury clothing brand to showcase their product, and for this, I need a highly realistic model.
Now it’s time to show you a structured image prompt, and I will follow a simple structure like subject + Camera Angle + Style and Medium + Lighting + Colour Palette.
Structured Prompt Example
“Subject: A confident woman in her 20s wearing a luxurious, red gown (give reference to your product), standing in a lush garden with a red rose, softly smiling with a calm expression, elegant posture highlighting the gown.
Camera Angle: Eye-level
Shot Types: wide / establishing shot.
Style and Medium: Cinematic high-fashion photography.
Lighting: Soft natural light from the left side, gentle highlights with shadows for depth.
Colour Palette: Deep crimson red (gown & rose), rich emerald and forest green (garden background), warm natural skin tones, soft golden highlights.”
I got this output.
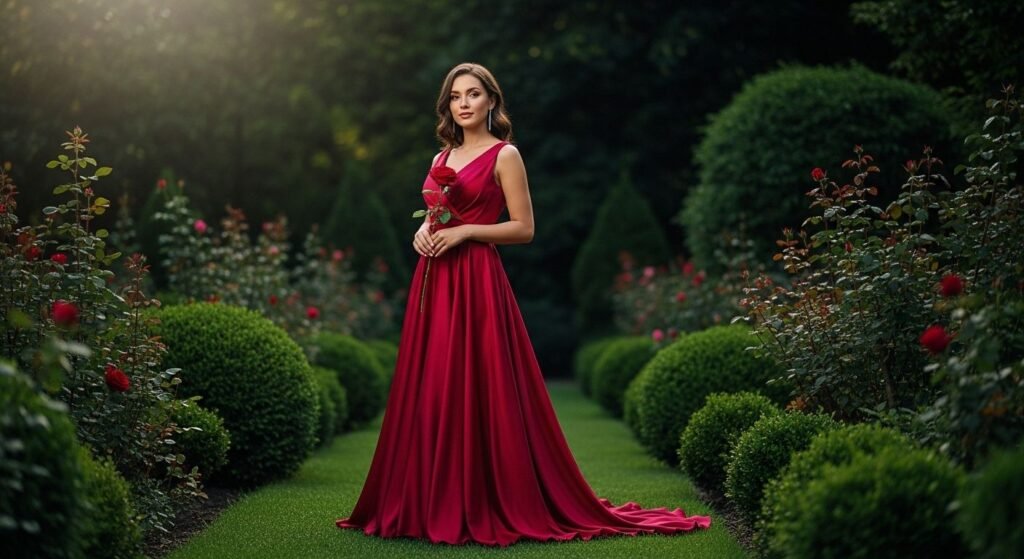
I think the output is actually what I am looking for without any errors.
I just followed a simple framework as I discussed earlier, and you can follow the same without overcomplicated things.
In fact, many professional video editors who regularly work with AI-generated visuals follow this exact principle:
They say that to stick to this simple structure and just refine over time, you’ll find an easy way to execute this AI image generation task.
So, you don’t need dozens of tricks or complex techniques. What actually works is consistency—using the same framework, improving your inputs, and gradually developing your visual sense.
Do that, and AI image generation stops feeling unpredictable… and starts becoming a skill you can control.
Bonus Tips on Image Prompts Writing
If you search on Google for ‘How to write image prompts’, there are a lot of results, but I still believe those are just for informational purposes, not experience-based.
I have followed many image prompting techniques earlier and always ended up in a hard-to-follow loop.
And finally, after receiving some expert advice, I found a better way to execute this.
In my opinion, instead of chasing complex frameworks, focus on clarity. Use simple words, clear sentences, and a structured format. That alone will improve your results more than any “advanced trick.”
And once you’re comfortable with that structure, you can take it a step further by adding negative prompts.
Basically, negative prompts act like guardrails—they tell the AI what to avoid. This helps reduce common issues like distortions, unwanted elements, or low-quality details, making your output cleaner and more reliable.
What Are Common AI Prompt Mistakes
I have already told you some of the major image prompt creation pillars, and if you don’t follow one of them, you’re going to get an improper result for sure.
Here are some of the common AI prompt mistakes
- Vague Descriptions.
- Conflicting Instructions.
- Over-Complication.
Just remove these while image prompting, and you’ll get what you desire.
My View on AI Image Prompts Writing
I think I have given you a fully structured overview of this AI image prompting topic, and I hope you get a clear understanding of what to focus on while prompting.
In my copywriting & Content Marketing career, I frequently need AI images, and I found that overcomplication, fancy words, and sentences generally lead to bad or improper output.
Actually, Clarity beats complexity—every time.
That’s exactly why I stick to this simple, structured approach. It’s practical, repeatable, and consistently delivers clean, usable outputs without the guesswork or vague results.
So, use this simple method to get a proper output from the AI image prompting.